Sunday, August 14, 2011

The Wheels

One of my earlier posts showed what my hubcaps looked like when I first got the Scotty.  They started out dirty and grimy but with a little elbow grease and some red car model paint from Hobby Lobby they cleaned up nicely.  I couldn't wait to see what they would look like with the wheel rims painted so here we go...

The tread is good and there is no dry rot so I need to get these wheels looking better.  The first step was to scuff up the old white paint with a wire brush attachment on my drill.  That worked well so I cleaned off all the crud and let them air dry.  I didn't want to get paint on the tires so I taped them off with regular old painters tape.

I used three coats of glossy, oil based paint in the turquoise that matched the original vintage awning that came with the trailer.  It was still in good shape so I am hoping to use it.  The turquoise will also be paired with bright glossy white for the outside of the trailer when it is completed.  I had to wait 3-4 hours between coats so it took awhile to get this part done.
OK, so I was pretty excited about how the wheels looked once I used about three coats of  tire shine and put the hubcaps back on.  I thought I was done but there was something that just wasn't sitting well with me.  They needed something else.  The next day it came to me....they needed some white trim to make them pop!  I decided to add a small rim of white and now I am over the moon about how they look!!!  The addition of the white was the icing on the cake, the ice cream on the cobbler, the whip cream on the pie!
Oh yes. Now I am in love with these wheels!  They pop and they have my accent color of red which I will match with two outdoor chairs and a vintage red igloo cooler I picked up at a thrift store for $7.  Fun.

Monday, July 18, 2011

The Chandelier

I found a cute little chandelier at Lowe's on sale.  I thought it would really glam up my little trailer so I snatched it up and starting planning how I would get it to stay up there safely while riding down the road.  I found this really shallow ceiling fan box which was perfect!


I used some angle brackets and attached it between two of the roof slats so it would remain secure up top.


I had to protect the wire as it moved into the box but the normal brackets wouldn't work since they sat too high.  I found this piece of tubing laying around the garage and cut it open along the side.  It fit around the edge of the metal so it forms a cushion.  I wouldn't want the wire getting worn through with all the movement going down the road!


This is how the box looked once it was installed.  The roof rafters sit on top of the side walls and are screwed down with wood screws. Insulation board will go between the rafters and then everything will be wrapped in Tyvek before the metal roof gets screwed down.


Now what do you think of this!?!?  I LOVE it!  It really looks beautiful lit up at night and takes the interior decor to the next level.  I was so happy that it turned out so well.  This picture shows my two favorite items in the whole trailer...the chandelier and the wine rack! 


Friday, July 15, 2011

The Curved Wall

Scotty trailers had a beautiful curved wall in them that formed the closet.  I tore mine out. I had to rebuild it but I didn't have a clue how to do it. Veneer was too thin and 1/8th inch luan does not like to be bent 90 degrees.  I had read where you can "kerf" a piece of wood to make it bend so that was my plan.  Kerfing is where you make multiple vertical scores in a piece of wood about 75% thru it's thickness.  The closer you place these grooves to each other the easier the wood will bend.  The deeper you go with the grooves the easier it is to bend.  Mind you, I only had 1/8th of an inch to work with here.  I was hesitant but I found that my dremel tool had a perfect bit size and I could set the depth to about 75% like I needed.  I set up a guide using two wood clamps and a straight board.  Here is a picture of the dremel and bit.

Then I proceeded to TEDIOUSLY and SLOWLY make about 60 some odd grooves where the piece of wood would need to bend the most.  It took a long time.  My neck started hurting.  My fingers went numb from the vibrations. I took lots of breaks but finally got it done. 

When I went to mount the thing....IT BROKE!  I should have done about 20 more grooves but I got impatient and paid the price.  Oh well.  Here's to PLAN B!

Corrugated metal.  Very bendy.  Easy to cut.  I knew I could paint it to match the cabinets and it would go along with my cottage theme right?  Here is what it looked like when it first went up.  I grabbed a can of this self etching primer.  Boy this stuff stinks.  And a warning to anyone using this....plan to sand it down like crazy.  It dries really rough.  I had to hand sand all the grooves.


After an hour of sanding the grey primer I put one coat of regular primer and two coats of the blue paint.  Then a final coat of the antique glaze I used on the cabinets.  I like it.  I like it ALOT!  My 14 year old daughter thinks it looks cool.  Score one for Mom.


Wednesday, July 13, 2011

Electrical System

So, the part of this build that was most intimidating to me was tackling the electrical system.  Whenever I would read posts on the web where people would discuss volts, amps, breakers and other electrical "things" my eyes would glaze over and my brain would just turn off.  I knew I had to learn this stuff because hiring an electrician to wire up this trailer was not going to be in my budget.  Luckily I have made email friends with a very knowledgable lady who LOVES electrical stuff and remodels all kinds of travel trailers.  She has been able to answer all my questions.  I also bought a "How To" book on basic wiring that helped alot.  I basically ran two circuits off of 20 amp breakers, used wire rated to carry 20 amps and used outlets and switches also rated for 20 amps. 


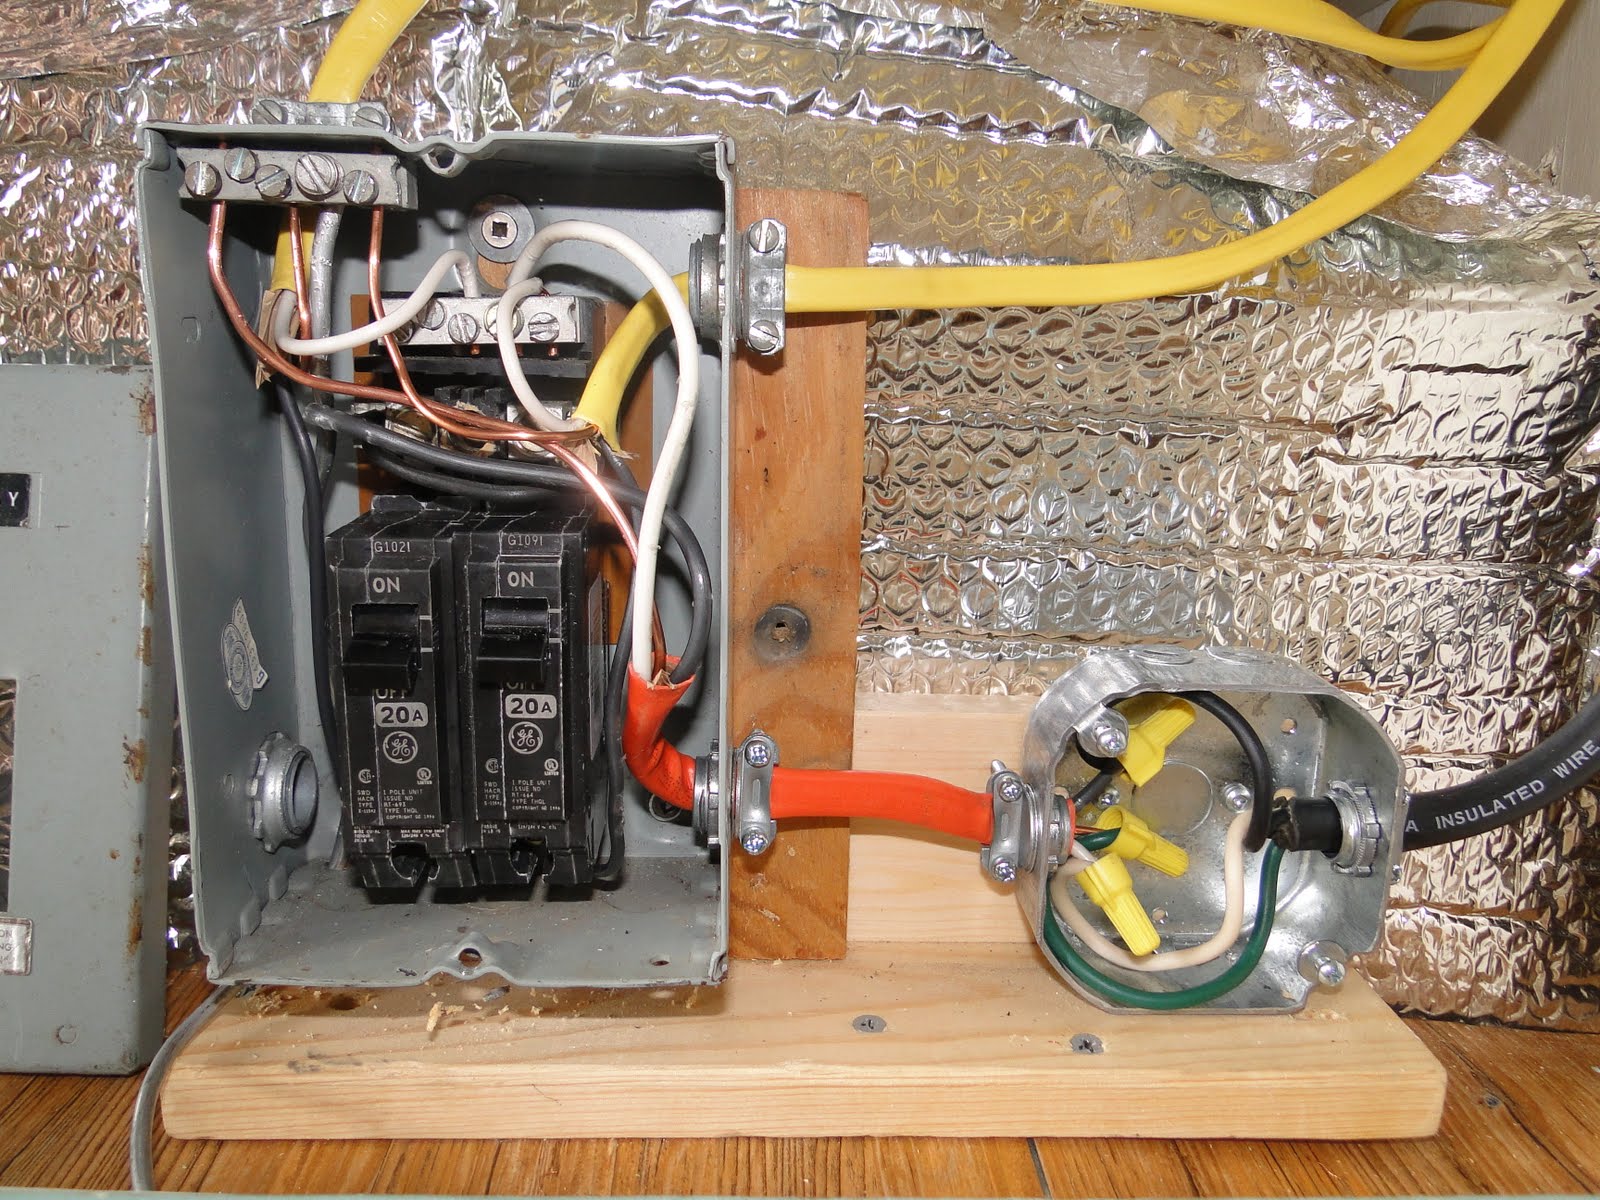
This picture above shows how I added a junction box to the right of the breaker box to house the shore power cord.  The orange wire is actually too short inside the junction box so I ended up going back and making the wires inside a little longer.  Code is to have the wires at least 6 inches inside.  I also rearranged the wires inside the breaker box so they weren't all jumbled to one side.  Each of the yellow wires goes to a different circuit.  You don't want too many items on one line or it can overload the circuit.


The above picture is inside the cabinet where the microwave will reside.  It will be plugged up to the outlet on the bottom of the cabinet.  This is circuit #1 and I have the microwave, the fridge and a couple of outlets on this circuit.  This one includes the outdoor outlet as well.  That groove on the back wall was a mistake....I was thinking I had to run the wire up to the kitchen cabinet so I routed out an access point and then realized after planning everything that I didn't have to do that afterall.  Bummer.  The beadboard was so pretty. I might have to fix that.


This is the inside of the fridge cabinet.  I am anxious to put the fridge in there but need to wait until I have all the 12 volt systems wired up.  That is next!  I ordered the supplies and have started reading up on the details.


This is the back side of an outlet I put in the potti closet.  I plan to hang a mirror and a vanity light  in there so thought it would be nice to have an extra outlet there for a hair dryer or something.  I will have more pictures of electrical later.  I finally plugged her up and tested all the outlets and they all work great!  Nothing was smoking or sizzling so I feel really good at getting it done and learning something new.  (I'm having an eletrician friend come review my work before she goes on the road though....just to make sure everything is fine.)

Wednesday, July 6, 2011

Dinette Table Leg


I have this old table on my back deck.  I was thinking how "blah" the current dinette table leg was in Josephine and what I might be able to replace it with that was consistent with my cottage decor.  Ha!  How about I make it look like this?


So, I had my daughter make a template out of posterboard and extend it by 2 inches to meet the height I needed. Then I traced it onto a 1/2" piece of plywood I had left over from some previous cuts.


I cut it out, sanded it down and primed it really well.  Then put on two coats of the blue color I was using on the rest of the cabinets and distressed it.  It put on a final coat of antique glaze to finish up. 


Here is what it looks like finished and in place inside the camper!  Much cuter than the original.  The table doesn't look level in this picture but it is in person.  I love it!

Sunday, May 8, 2011

Big Update

I have been a bit lazy in my posts lately so I need a big update covering everything I completed in April.  March and April saw really bad weather here in the South.  Tornados, high winds and bad storms.  I had Josephine under a 20' x 10' canopy but it was picked up in a storm fully intact and sent over a 20' tall hedge.  I found it hanging from my neighbors roof in the morning.


Poor Josephine suffered a torrential rain without her cover so I lost two weeks drying her out and figuring out how to get her into the garage.  My garage door is only 84" tall and she is 90" tall.  I ended up taking off her wheels and sitting the drums on two car dollies.  She rolled right in after that and is now safe and sound in the garage.


I cleaned up her hub caps and repainted the Scotty logo on them.  I think they turned out nice.


When I camp I have to sleep well.  The couch cushions would never work for my hubby and I so I decided we would have a permanant bed and give up the couch.  I got the top of the bed frame finished.  I will add two drawers underneath for extra storage.  I will also have the water tank and water pump under there as well.  This way the water pump will be insulated a bit from making too much noise.


I also made some headway on the kitchen cabinets.  I am going for the vintage cottage look so the cabinets are distressed and glazed.  The backsplash looks like vintage ceiling tiles and the hardware will be vintage as well.  I love the look so far!


To get this look I used one coat of primer, one coat of the lighter wall paint and two coats of the blue.  Then I sanded it down to rough it up a bit and rubbed on the glaze. 

Tuesday, March 15, 2011

More Progress

I just opened a Shutterfly account  and posted all my pictures here http://scottyhilanderrebuild.shutterfly.com/pictures/8  I will update regularly.  You know, with a blog you really don't need a scrap book because this serves as a journal and scrapbook all in one!

Ok, so the first wall is built and I couldn't wait to get it mounted. There were a few things that had to be done before I could get it done.  For example, the black paint you see along the bottom is Herculiner.  It is a bed liner paint that will prevent water damage.  I couldn't use treated lumber with the aluminum so I had to have an alternative.  The black part attaches directly to the frame of the trailer except where the wheel will be.


Second, the seams where the plywood came together were glued with biscuit joinery but they were not strong enough to stand moving them from the garage.  The 2x4 braces worked well to stabilize them and keep them from breaking while we were mounting the wall.


I attached a 2x4 to the bottom of the frame earlier to serve as a shelf while we mounted this puppy.  It was very heavy and I only had my son to help me so having braces installed helped.


I used 2 1/2" wood screws to attach the wall to the frame in several places. I always predrill because the worst thing that can happen would be to split the frame and have to go back and replace it. The wall fit front and back so that was a good sign.  I won't know if it is exactly right until the other wall goes up, the roof goes on and the skins line up.  This is what it looked like when it was mounted.  The boards are attached to keep the wall stable and plumb while I make the second wall.  The seam boards you see on the beadboard side will be hidden when the trailer is finished.